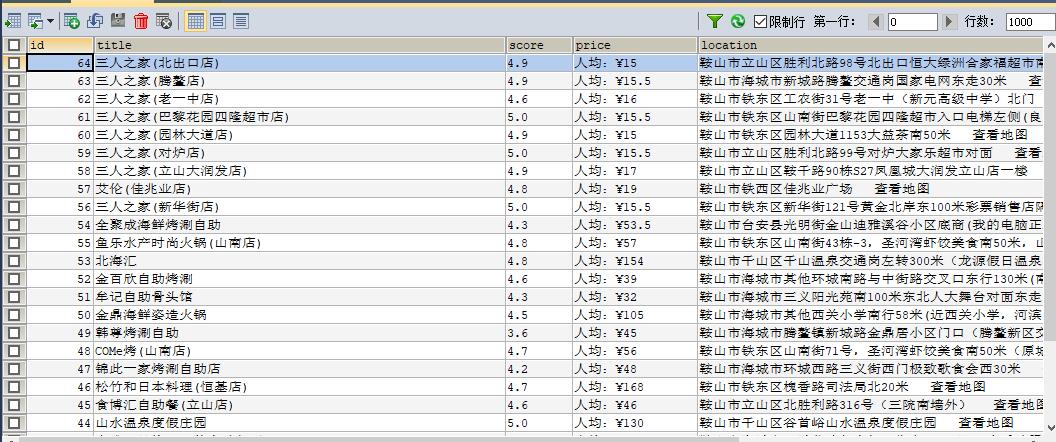
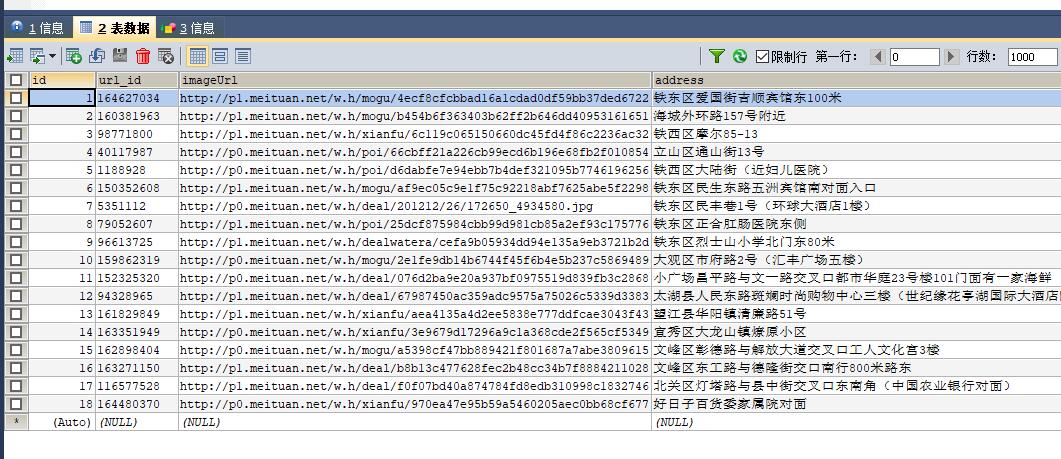
对百度糯米、美团、大众点评的数据进行爬取并保存到 mongodb 数据库和mysql数据库
一、首先准备我们需要的库
1、requests//用来请求网页

2、json//用来解析json数据,用于把json数据转换为字典

3、re//利用正则对字符串查找

3、pyquery//利用css查找

4、pymongo//存取pymongo

5、MySQLdb//存取mysql
创建一个配置文件config.py用于存储数据库的密码
MYSQL_HOST='localhost'
MYSQL_USER='root'
MYSQL_PASSWORD=''
MYSQL_DB='test'
MOGO_URL='localhost'
MOGO_DB='nuomi'
MOGO_TABLE='product'
MOGO_DB_M='meituan'
MOGO_TABLE_M='product'
MOGO_DB_D='dazhong'
MOGO_TABLE_D='product'
二、百度糯米
1、获取全国的url
def get_city():
    url='https://www.nuomi.com/pcindex/main/changecity'
    response=requests.get(url)
    response.encoding='utf-8'
    doc=pq(response.text)
    items=doc('.city-list .cities li').items()
    for item in items:
        product={
            'city':item.find('a').text(),
            'url':'https:'+item.find('a').attr('href')
        }
        get_pase(product['url'],keyword)
2、通过关键字搜索商品
def get_pase(url,keyword):
    head={
        'k':keyword,
    }
    urls=url+'/search?'+urlencode(head)
    response=requests.get(urls)
    response.encoding = 'utf-8'
    req=re.findall('noresult-tip',response.text)
    if req:
        print('抱歉,没有找到你搜索的内容')
    else:
        req=r'<a href="(.*?)" target="_blank"><img src=".*?" class="shop-infoo-list-item-img" /></a>'
        url_req=re.findall(req,response.text)
        for i in url_req:
            url_pase='https:'+i
            get_pase_url(url_pase)
        req=r'<a href="(.*?)" .*? class="ui-pager-normal" .*?</a>'
        url_next=re.findall(req,response.text)
        for i in url_next:
            url_pases=url+i
            get_pase_url(url_pases)
3、获取商品页的商品信息
def get_pase_url(url):
    response=requests.get(url)
    response.encoding = 'utf-8'
    doc=pq(response.text)
    product={
        'title':doc('.shop-box .shop-title').text(),
        'score':doc('body > div.main-container > div.shop-box > p > span.score').text(),
        'price':doc('.shop-info .price').text(),
        'location':doc('.item .detail-shop-address').text(),
        'phone':doc('body > div.main-container > div.shop-box > ul > li:nth-child(2) > p').text(),
        'time':doc('body > div.main-container > div.shop-box > ul > li:nth-child(3) > p').text(),
        'tuijian':doc('body > div.main-container > div.shop-box > ul > li:nth-child(4) > p').text()
    }
    print(product)
    save_mysql(product)
    #save_mongodb(product)
4、保存到数据库中
def save_mysql(product):
    conn=MySQLdb.connect(MYSQL_HOST,MYSQL_USER,MYSQL_PASSWORD,MYSQL_DB,charset='utf8')
    cursor = conn.cursor()
    cursor.execute("insert into nuomi(title,score,price,location,phone,time,tuijian) values('{}','{}','{}','{}','{}','{}','{}')".format(product['title'] , product['score'] , product['price'] , product['location'] , product['phone'] ,product['time'] , product['tuijian']))
    print('成功存入数据库',product)
def save_mongodb(result):
    client=pymongo.MongoClient(MOGO_URL)
    db=client[MOGO_DB]
    try:
        if db[MOGO_TABLE].insert(result):
            print('保存成功',result)
    except Exception:
        print('保存失败',result)

二、美团
1、获取全国的url
def get_city():
    url='http://www.meituan.com/changecity/'
    response=requests.get(url)
    response.encoding='utf-8'
    doc=pq(response.text)
    items=doc('.city-area .cities .city').items()
    for item in items:
        product={
            'url':'http:'+item.attr('href'),
            'city':item.text()
        }
        get_url_number(product['url'])
2、通过关键字搜索商品
def get_url_number(url):
    try:
        response=requests.get(url)
        req=r'{"currentCity":{"id":(.*?),"name":".*?","pinyin":'
        number_url=re.findall(req,response.text)
        for code in range(0,500,32):
            url='http://apimobile.meituan.com/group/v4/poi/pcsearch/{}?limit=32&offset={}&q={}'.format(number_url[0],code,keyword)
            response=requests.get(url)
            data=json.loads(response.text)
            imageUrl=data['data']['searchResult'][0]['imageUrl']
            address=data['data']['searchResult'][0]['address']
            lowestprice=data['data']['searchResult'][0]['lowestprice']
            title=data['data']['searchResult'][0]['title']
            url_id=data['data']['searchResult'][0]['id']
            product={
                'url_id':url_id,
                'imageUrl':imageUrl,
                'address':address,
                'lowestprice':lowestprice,
                'title':title
            }
            save_mysql(product)
    except Exception:
        return None
3、保存到数据库中
def save_mysql(product):
    conn=MySQLdb.connect(MYSQL_HOST,MYSQL_USER,MYSQL_PASSWORD,MYSQL_DB,charset='utf8')
    cursor = conn.cursor()
    cursor.execute("insert into meituan(url_id,imageUrl,address,lowestprice,title) values('{}','{}','{}','{}','{}')".format(product['url_id'], product['imageUrl'], product['address'], product['lowestprice'], product['title']))
    print('成功存入数据库',product)
def save_mongodb(result):
    client=pymongo.MongoClient(MOGO_URL)
    db=client[MOGO_DB_M]
    try:
        if db[MOGO_TABLE_M].insert(result):
            print('保存成功',result)
    except Exception:
        print('保存失败',result)

三、大众点评
1、获取全国的url
def get_url_city_id():
    url = 'https://www.dianping.com/ajax/citylist/getAllDomesticCity'
    headers = {
        'User-Agent': 'Mozilla/5.0(Windows NT 10.0;Win64;x64)AppleWebKit/537.36(KHTML,likeGecko)Chrome/64.0.3282.186Safari/537.36' ,

    }
    response = requests.get(url , headers=headers)
    data=json.loads(response.text)
    for i in range(1,35):
        url_data=data['cityMap'][str(i)]
        for item in url_data:
            product={
                'cityName':item['cityName'],
                'cityId':item['cityId'],
                'cityEnName':item['cityEnName']
            }
            get_url_keyword(product)
            break
2、通过关键字搜索商品
def get_url_keyword(product):
    urls = 'https://www.dianping.com/search/keyword/{}/0_%{}'.format(product['cityId'], keyword)
    headers = {
        'User-Agent': 'Mozilla/5.0(Windows NT 10.0;Win64;x64)AppleWebKit/537.36(KHTML,likeGecko)Chrome/64.0.3282.186Safari/537.36' ,

    }
    response = requests.get(urls, headers=headers)
    req=r'data-hippo-type="shop" title=".*?" target="_blank" href="(.*?)"'
    data=re.findall(req,response.text)
    for url in data:
        get_url_data(url)
3、获取商品页的商品信息
def get_url_data(url):
    headers= {
        'User-Agent': 'Mozilla/5.0(Windows NT 10.0;Win64;x64)AppleWebKit/537.36(KHTML,likeGecko)Chrome/64.0.3282.186Safari/537.36' ,
        'Host': 'www.dianping.com',
        'Pragma': 'no - cache',
        'Upgrade - Insecure - Requests': '1'
    }
    response = requests.get(url,headers=headers)
    doc=pq(response.text)
    title=doc('#basic-info > h1').text().replace('\n','').replace('\xa0','')
    avgPriceTitle=doc('#avgPriceTitle').text()
    taste=doc('#comment_score > span:nth-of-type(1)').text()
    Environmental=doc('#comment_score > span:nth-of-type(2)').text()
    service=doc('#comment_score > span:nth-of-type(3)').text()
    street_address=doc('#basic-info > div.expand-info.address > span.item').text()
    tel=doc('#basic-info > p > span.item').text()
    info_name=doc('#basic-info > div.promosearch-wrapper > p > span').text()
    time=doc('#basic-info > div.other.J-other > p:nth-of-type(1) > span.item').text()
    product={
        'title':title,
        'avgPriceTitle':avgPriceTitle,
        'taste': taste ,
        'Environmental':Environmental,
        'service': service ,
        'street_address':street_address,
        'tel': tel ,
        'info_name':info_name,
        'time':time
    }
    save_mysql(product)
3、保存到数据库中
def save_mysql(product):
    conn=MySQLdb.connect(MYSQL_HOST,MYSQL_USER,MYSQL_PASSWORD,MYSQL_DB,charset='utf8')
    cursor=conn.cursor()
    cursor.execute("insert into dazhong(title,avgPriceTitle,taste,Environmental,service,street_address,tel,info_name,time) values('{}','{}','{}','{}','{}','{}','{}','{}','{}')".format(product['title'],product['avgPriceTitle'],product['taste'],product['Environmental'],product['service'],product['street_address'],product['tel'],product['info_name'],product['time']))
    print('成功存入数据库' , product)
def save_mogodb(product):
    client=pymongo.MongoClient(MOGO_URL)
    db=client[MOGO_DB_D]
    try:
        if db[MOGO_TABLE_D].insert(product):
            print('保存成功',product)
    except Exception:
        print('保存失败',product)
详细的描述可以访问我的Github TomorrowLi 里面有我的源码
最新的模拟知乎登陆
首先我们知道随着知乎页面的不断改版,以前的模拟登陆以不能用了,以下是对知乎改版之后的最新登陆方法
一、首先我们所需要的库
import requests
import time
import re
#用于下载验证码图片
import base64
#通过 Hmac 算法计算返回签名。实际是几个固定字符串加时间戳
import hmac
import hashlib
import json
import matplotlib.pyplot as plt
#保存cookie
from http import cookiejar
#打开图片
from PIL import Image
二、所需要的头信息
#所需要的头部信息
HEADERS = {
'Connection': 'keep-alive',
'Host': 'www.zhihu.com',
'Referer': 'https://www.zhihu.com/',
'User-Agent': 'Mozilla/5.0 (Linux; Android 6.0; Nexus 5 Build/MRA58N) AppleWebKit/537.36 '
              '(KHTML, like Gecko) Chrome/56.0.2924.87 Mobile Safari/537.36'
}
#登陆使的url
LOGIN_URL = 'https://www.zhihu.com/signup'
LOGIN_API = 'https://www.zhihu.com/api/v3/oauth/sign_in'
FORM_DATA = {
    #客户端id基本不会改变
    'client_id': 'c3cef7c66a1843f8b3a9e6a1e3160e20',
    'grant_type': 'password',
    'source': 'com.zhihu.web',
    'username': '用户名',
    'password': '密码',
    # 改为'cn'是倒立汉字验证码
    'lang': 'en',
    'ref_source': 'homepage'
}
要想登陆成功,header里必须还要俩个参数
#经过大量的验证,这个参数必须有,这个值基本不变
'authorization': 'oauth c3cef7c66a1843f8b3a9e6a1e3160e20',
#X-Xsrftoken则是防 Xsrf 跨站的 Token 认证,在Response Headers的Set-Cookie字段中可以找到。所以我们需要先请求一次登录页面,然后用正则把这一段匹配出来。注意需要无 Cookies 请求才会返回 Set-Cookie
'X-Xsrftoken': _xsrf
要想登陆成功,form_data也里必须还要俩个参数
'captcha': 验证码,
'timestamp': 时间戳,
'signature': 是通过 Hmac 算法对几个固定值和时间戳进行加密
timestamp 时间戳,这个很好解决,区别是这里是13位整数,Python 生成的整数部分只有10位,需要额外乘以1000
timestamp = str(int(time.time()*1000))
captcha 验证码,是通过 GET 请求单独的 API 接口返回是否需要验证码(无论是否需要,都要请求一次),如果是 True 则需要再次 PUT 请求获取图片的 base64 编码。
 def _get_captcha(self, headers):
    """
    请求验证码的 API 接口,无论是否需要验证码都需要请求一次
    如果需要验证码会返回图片的 base64 编码
    根据头部 lang 字段匹配验证码,需要人工输入
    :param headers: 带授权信息的请求头部
    :return: 验证码的 POST 参数
    """
    lang = headers.get('lang', 'en')
    if lang == 'cn':
        api = 'https://www.zhihu.com/api/v3/oauth/captcha?lang=cn'
    else:
        api = 'https://www.zhihu.com/api/v3/oauth/captcha?lang=en'
    resp = self.session.get(api, headers=headers)
    show_captcha = re.search(r'true', resp.text)
    if show_captcha:
        put_resp = self.session.put(api, headers=headers)
        img_base64 = re.findall(
            r'"img_base64":"(.+)"', put_resp.text, re.S)[0].replace(r'\n', '')
        with open('./captcha.jpg', 'wb') as f:
            f.write(base64.b64decode(img_base64))
        img = Image.open('./captcha.jpg')
        if lang == 'cn':
            plt.imshow(img)
            print('点击所有倒立的汉字,按回车提交')
            points = plt.ginput(7)
            capt = json.dumps({'img_size': [200, 44],
                               'input_points': [[i[0]/2, i[1]/2] for i in points]})
        else:
            img.show()
            capt = input('请输入图片里的验证码:')
        # 这里必须先把参数 POST 验证码接口
        self.session.post(api, data={'input_text': capt}, headers=headers)
        return capt
    return ''
signature 通过 Crtl+Shift+F 搜索找到是在一个 JS 里生成的,是通过 Hmac 算法对几个固定值和时间戳进行加密,那么只需要在 Python 里也模拟一次这个加密即可。
def _get_signature(self, timestamp):
    """
    通过 Hmac 算法计算返回签名
    实际是几个固定字符串加时间戳
    :param timestamp: 时间戳
    :return: 签名
    """
    ha = hmac.new(b'd1b964811afb40118a12068ff74a12f4', digestmod=hashlib.sha1)
    grant_type = self.login_data['grant_type']
    client_id = self.login_data['client_id']
    source = self.login_data['source']
    ha.update(bytes((grant_type + client_id + source + timestamp), 'utf-8'))
    return ha.hexdigest()
文章出自 知乎
有关servlet的几种面试题
javaEE之几种常见的连接池
1、c3p0连接池
* 步骤:
        1. 导入jar包 (两个)
             c3p0-0.9.5.2.jar
            mchange-commons-java-0.2.12.jar ,
            * 不要忘记导入数据库驱动jar包
        2. 定义配置文件:

            * 名称: c3p0.properties 或者 c3p0-config.xml(文件名称必须是这两个中其中一个)

            * 路径:直接将文件放在src目录下即可。自动加载,不需要用getClassLoader()加载配置文件路径

        3. 创建核心对象 数据库连接池对象     ComboPooledDataSource
        4. 获取连接: getConnection

    * 代码:
         //1.创建数据库连接池对象
        DataSource ds  = new ComboPooledDataSource();
        //2. 获取连接对象
        Connection conn = ds.getConnection();
Mysql之忘记密码
javaEE之有关Stream流的几种操作方式
一、字节流
(1)FileInputStream文件输入流
 int read(byte[] b)
      从此输入流中将最多 b.length 个字节的数据读入一个 byte 数组中。
  int read(byte[] b, int off, int len)
      从此输入流中将最多 len 个字节的数据读入一个 byte 数组中。
(2)FileOutputStream文件输出流
 void write(byte[] b)
      将 b.length 个字节从指定 byte 数组写入此文件输出流中。
 void write(byte[] b, int off, int len)
          将指定 byte 数组中从偏移量 off 开始的 len 个字节写入此文件输出流。
 void write(int b)
      将指定字节写入此文件输出流。
二、字符流(用来读写中文时方便)
(1)FileReader字符输入流
(2)FileWriter字符输出流
三、缓冲流(提高读写速度)
(1)BufferedInputStream字节缓冲输入流
(2)BufferedOutputStream字节缓冲输入流
(3)BufferedReader字符缓冲输入流
特有的方法,当你要对于逐行操作时
String readLine()
      读取一个文本行。
(4)BufferedWriter字符缓冲输出流
 void newLine()
      写入一个行分隔符。
 void write(char[] cbuf, int off, int len)
          写入字符数组的某一部分。
 void write(int c)
          写入单个字符。
 void write(String s, int off, int len)
          写入字符串的某一部分。
四、转换流
这个流有两个作用
(1)用于以指定的编码方式打开文件
InputStreamReader(InputStream in, String charsetName) 创建使用指定字符集的 InputStreamReader。
(2)转换某一种流为指定的流,当只有字节流时,你想用到字符流操作中文时
 FileInputStream fis = new FileInputStream("javaEE\\src\\day10\\demo03\\1.txt");
 InputStreamReader isr = new InputStreamReader(fis);
 BufferedReader br=new BufferedReader(isr);
五、序列化流(用于搞对象的流)
(1)序列化(把对象以字节的方式写入文件中)
ObjectOutputStream os = new ObjectOutputStream(new FileOutputStream("javaEE\\src\\day10\\demo04\\person.txt"));
os.writeObject(new Person("liming",20));
(2)反序列化(从文件中把对象读出来)
ObjectInputStream os = new ObjectInputStream(new FileInputStream("javaEE\\src\\day10\\demo04\\person.txt"));
System.out.println(os.readObject());
(3)当你想要传入多个对象时,你可以先把对象存到集合中在对集合进行序列化
(4)当对对象序列化时要在对象中加入下面的代码,防止你修改对象的属性时,序列化不成功
private static final long serialVersionUID=1L;
六、打印流
(1)System.out.println()
(2)从控制台输入到指点文件中
System.out.println("控制台");
PrintStream p=new PrintStream("javaEE\\src\\day10\\dem\1.txt");
System.setOut(p);
System.out.println("文件中");
七、用于读取配置信息的流
(1)能够使用Properties的load方法加载文件中配置信息
java.util.Properties 继承于 Hashtable ,来表示一个持久的属性集。它使用键值结构存储数据,每个键及其 对应值都是一个字符串。该类也被许多Java类使用,比如获取系统属性时, System.getProperties 方法就是返回 一个 Properties 对象。

void load(InputStream inStream)
      从输入流中读取属性列表(键和元素对)。

//创建Properties对象
Properties prop = new Properties();
//通过load方法加载指定的配置文件
prop.load(new FileReader("javaEE\\src\\day09\\demo03\\1.txt"));
//通过stringPropertyNames()方法来获取配置文件的所有键
Set<String> strings = prop.stringPropertyNames();
//遍历键值来获取value属性,来获取配置信息
for (String string : strings) {
    System.out.println(string+"="+prop.get(string));
}
(2)能够使用Properties的store方法写入配置信息
 void store(OutputStream out, String comments)
      以适合使用 load(InputStream) 方法加载到 Properties 表中的格式,将此 Properties 表中的属性列表(键和元素对)写入输出流。

FileWriter fw = new FileWriter("javaEE\\src\\day09\\de\1.txt");
prop.store(fw,"abc");//"abc"是配置文件的名字
八、用于操作集合数组的Stream流(学此流你必须先学会lambda和常用的函数式接口)
两种产生流的方式
- 集合名.stream()
- Stream.of(数组名)
(1)forEach(里面是Consumer消费型接口):可以用lambda表达式来遍历集合和数组
stream.forEach(i-> System.out.println(i));
(2)filter(里面是Predicate接口):用于对流中的数据进行过滤
Stream<T> filter(Predicate<? super T> predicate);
(3)map(里面是Function转换型接口):用于将流中的数据转换为另外一种数据
<R> Stream<R> map(Function<? super T, ? extends R> mapper)
(4)count():用于统计流中的数据的个数
long count()
(5)limit():用于截取流,获取前n个数据
Stream<T> limit(long n);
(6)skip():用于截取流,跳过前n个数据,留下剩余的数据
Stream<T> skip(long n);
(7)concat():用于合并两个流,新的流中就包含了两个流中的数据
static <T> Stream<T> concat(Stream<? extends T> a, Stream<? extends T> b)
javaEE之有关线程的问题
开启线程是使用start()方法还是run()方法,它们有什么区别
(1) start()方法是开启线程,并执行run()方法里面的方法体
(1) run()方法只能执行方法体,不能执行start()方法
线程池优点
(1)提高响应速度
(2)可以便于管理线程
(3)合理利用内存资源
sleep和wait的区别
(1)sleep是Thread类中的方法,而且是静态方法,直接可以通过类名调用 wait方法是Object类中的方法,不是静态的,通过锁对象调用
(2)sleep的方法都必须传递了时间参数,如果传递是计时等待 wait有传递参数,也可以不传递参数,如果传递了时间参数,是计时等待,如果没有传递参数,是无限等待
(3)如果sleep和wait在同步中使用,sleep不会释放锁,wait会释放锁
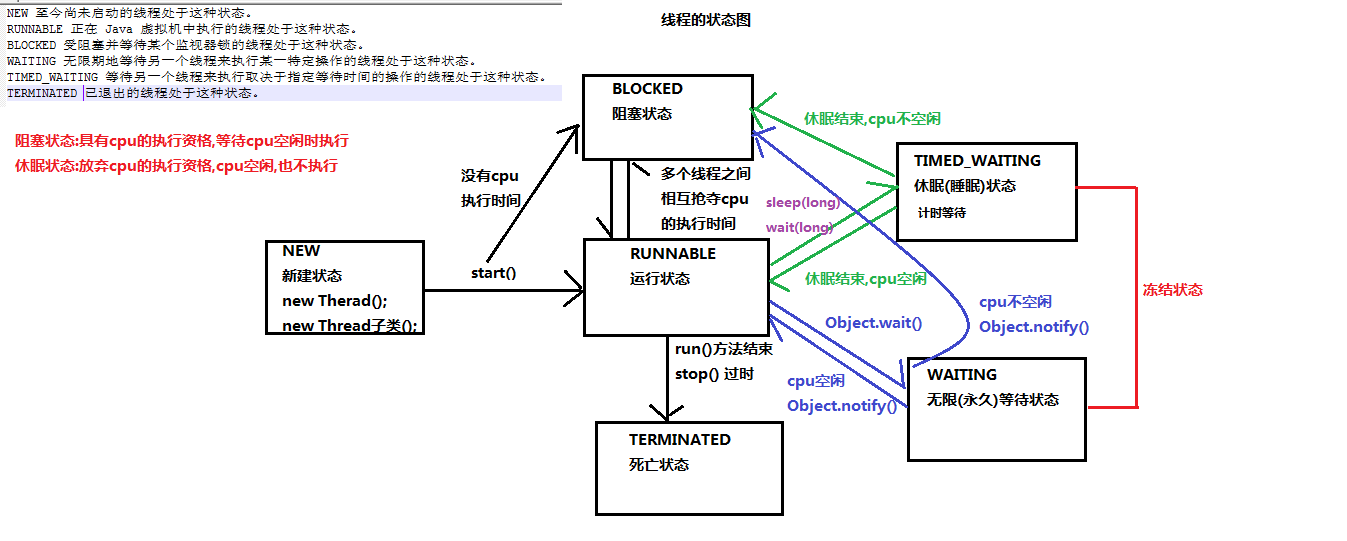
线程状态图
